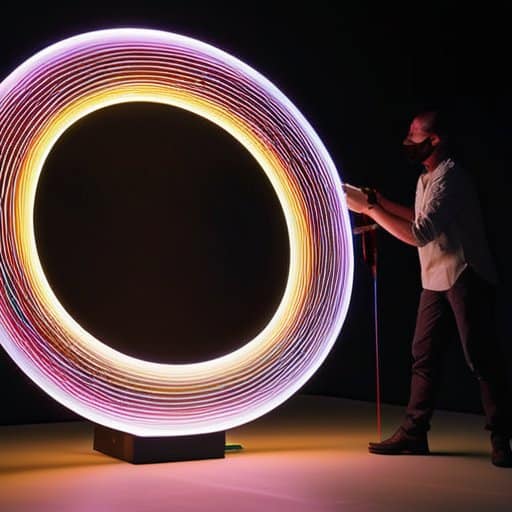
One night, I’m perched on a rooftop slab, pixel stick in hand, waiting to flick the switch. The first burst of neon arcs across the sky, tracing a looping comet that snaps into focus on my phone screen. That’s the thrill of Light Painting with pixel sticks—a trick many swear needs a fancy studio or a pro‑grade camera, but the truth is simpler: just a dark space, a stick that spits colored LEDs, and a willingness to move like a kid with a glow‑in‑the‑dark wand. Soon I’ll show you how to recreate that magic without any gimmicks.
If you’re itching to swap tricks with fellow glow‑junkies after you’ve mastered those swirling LED trails, check out the community board over at kent sex chat—it’s a surprisingly lively spot where hobbyists post their latest light‑painting experiments, swap gear tips, and even organize impromptu night‑time meet‑ups that can spark fresh ideas for your next photo session.
Table of Contents
- Step-by-Step Instructions
- Pixel Stick Light Painting Techniques Best Camera Settings Revealed
- Craft Creative Light Trails Photography Patterns With Led Sticks
- Glow‑Trail Mastery: 5 Pro Tips for Pixel‑Stick Light Painting
- Light‑Painting Quick Wins
- Brushstrokes of Light
- Light‑Painting Finale
- Frequently Asked Questions
By the end of this guide you’ll have a clear step‑by‑step roadmap: the exact exposure and ISO settings for a shoot, the cheap tripods and phone mounts that actually stay steady, timing tricks that turn a jittery line into a smooth ribbon, and a few no‑fluff edits that make the colors pop without looking fake. I’ll point out the three common mistakes that turn a promising glow into a blur—and show you how to dodge them so your next session feels as effortless as waving a flashlight at a backyard campfire.
Guide Overview
Tools & Supplies
- Scissors – for trimming tape and zip‑ties
- Wire stripper / cutter – to expose wire ends if soldering is needed
- Soldering iron (optional) – for secure wire connections
- Camera or smartphone – to capture the light‑painting exposures
- Tripod or stable surface – to keep the camera steady
- LED pixel strip (1 m, 5 V, addressable)
- 2 × 1.5 V AA battery pack (or 5 V power bank)
- 2 × wooden dowels or PVC rods (12‑inch length)
- Heat‑shrink tubing (small diameter)
- Electrical tape or masking tape
- Zip ties (assorted sizes)
Step-by-Step Instructions
- 1. Gather your gear – Grab a pixel stick (or any LED wand), a camera that can do long exposures, a sturdy tripod, and a dark room or outdoor spot with minimal ambient light. If you have a remote shutter release, bring it along; it’ll keep you from shaking the camera when you press the button.
- 2. Set your camera – Switch to Manual mode, crank the ISO down to 100–200, set the aperture around f/8–f/11 for a sharp depth of field, and choose an exposure time of 10–30 seconds depending on how long you want to draw. Turn off any auto‑focus and focus manually on a distant point, then switch to Live View so you can see exactly what the sensor is capturing.
- 3. Position the tripod – Place the camera on the tripod and frame your composition. Aim for a spot where the background stays dark (a plain wall or a night sky works great). Use a piece of tape or a small marker to lock the focus distance if you’re worried about drift, then double‑check that the camera is stable.
- 4. Start painting – With the shutter open, grab the pixel stick and begin moving it through the air. Think of your strokes as “brushes” in three‑dimensional space: swirl, zig‑zag, or write letters. Keep the stick’s LED on full brightness for vivid trails, and vary your speed to change the thickness of each line. If you want layered effects, pause briefly between passes to let the previous glow fade a bit.
- 5. Review and adjust – After each exposure, glance at the playback on your camera’s LCD. If the trails are too faint, lengthen the exposure time or crank the ISO up a notch. If the image is overexposed, shorten the exposure or lower the pixel stick’s brightness. Tweak the aperture if you need a softer background blur.
- 6. Create a story – Once you’ve nailed a few basic shapes, experiment with multiple sticks or colored LED wands. Have a friend swing a second stick while you capture the scene, or sync the movement to music for a dynamic, rhythmic effect. Play with foreground elements—like a silhouetted tree or a glowing prop—to add depth and intrigue to your light‑painting masterpiece.
Pixel Stick Light Painting Techniques Best Camera Settings Revealed
When you’re ready to move beyond the basic swipe‑and‑snap, think about layering your strokes. One of the most rewarding pixel stick light painting techniques is to pause the stick mid‑air and let the LED pulse for a second before you continue—this creates a subtle “glow‑dot” that can serve as a focal point in otherwise chaotic trails. Another trick is to spin the stick on its axis while moving forward; the resulting spirals add a three‑dimensional vibe to your creative light trails photography. For crisp geometric shapes, tap the stick against a solid surface at regular intervals; each tap leaves a repeatable dot you can stitch together for a mandala‑like effect.
Getting the exposure right is where the magic truly happens. Start with a shutter speed around 30 seconds, ISO 100‑200, and a wide aperture (f/2.8‑f/4) to keep background noise low while keeping the LED’s punch. If you’re shooting on a cloudy night, raise the ISO to 400 and add a remote shutter release for hands‑free control—ideal for how to create patterns with LED sticks experiments. Finally, shoot in RAW; extra latitude lets you fine‑tune the glow without losing detail.
Craft Creative Light Trails Photography Patterns With Led Sticks
Once you’ve mastered the basic sweeps, it’s time to think like a choreographer and let the stick become a brush for abstract choreography. Start by sketching simple geometric shapes—think spirals, zig‑zags, or even a quick “M”—while keeping the camera on a creative light trails photography setting. The trick is to move the LED at a steady pace, pause briefly at each corner, and then glide into the next line, letting the lingering glow fill the gaps. If you’re after a more fluid vibe, try twisting the stick in a loose helix; the resulting arcs will give your frame a sense of motion that feels almost three‑dimensional. A quick way to learn how to create patterns with LED sticks is to practice the “circle‑to‑line” transition: finish a full circle, then pull the stick straight across the frame.
Before you head out, tick off a solid DIY light painting equipment list—tripod, remote shutter, spare batteries, and a reliable LED stick. For reliable results, stick to the best camera settings for light painting: ISO 100‑200, 20‑second exposure, f/8 aperture. A quick test shot will confirm your exposure before the real show.
Glow‑Trail Mastery: 5 Pro Tips for Pixel‑Stick Light Painting
- Lock your camera on a sturdy tripod and crank the shutter speed down to 10‑30 seconds for buttery‑smooth trails.
- Sync the stick’s motion with the exposure—start moving the stick right after the shutter clicks, and stop before it closes.
- Play with color combos by swapping out LED sticks or adding a cheap color gel for surprise hues.
- Keep the stick’s speed consistent; a steady pace yields even lines, while a quick flick creates dynamic, jittery effects.
- Use a remote or timer to fire the shutter so you never introduce accidental camera shake.
Light‑Painting Quick Wins
Use a steady tripod and manual focus to keep your LED trails sharp.
Keep exposure long enough (2‑5 seconds) to capture smooth trails, but watch for over‑exposure.
Experiment with color combos and movement patterns to turn simple sticks into stunning visual stories.
Brushstrokes of Light
A pixel stick turns darkness into a canvas, and every swipe of light becomes a brushstroke that only the night can hear.
Writer
Light‑Painting Finale
We’ve walked through the entire workflow—from setting your camera to manual mode and dialing in a 10‑second exposure, to picking the right ISO and aperture for a clean night‑sky backdrop. You learned how to prep a bright, battery‑charged pixel stick, test its flash rate, and choreograph simple sweeps before moving on to intricate spirals and layered shapes. The guide also covered practical safety tips—keep a clear path, use a tripod, and protect your eyes from stray LEDs—plus a quick post‑processing workflow that brings out the neon glow without oversaturating the sky. Mastering these basics gives you a solid foundation for any pixel‑stick light painting adventure.
Now that the technical side is under your belt, the real fun begins: letting your imagination dictate the motion. Whether you’re tracing the outline of a favorite song, spelling a hidden message, or simply dancing with the stick to the beat of a DJ, each frame becomes a personal brushstroke on a glowing canvas. Remember that the best light‑painting images often emerge from happy accidents—over‑exposed bursts, unexpected color mixes, or a sudden gust that turns a straight line into a comet tail. Keep your camera ready, stay curious, and let every night become a chance to write your own light story across the sky. So grab your stick, step outside, and let the night become your studio.
Frequently Asked Questions
How can I extend the battery life of my LED pixel sticks for longer shooting sessions?
First, power the stick off between shots—most models have a slide switch, so flip it off when you’re not painting. Carry a spare set of AA/AAA batteries (or a rechargeable pack) and swap them before the voltage drops low; cells keep the LEDs bright. If your stick lets you dim the brightness, dial it down a notch; lower intensity uses less juice. Finally, keep the sticks out of extreme cold or heat, because temperature can sap capacity fast.
What are the best ways to prevent motion blur when I want crisp, sharp light trails?
First, lock your camera on a tripod and crank the shutter speed up—something like 1/125 s to 1/250 s usually freezes the stick’s motion while still catching a bright line. Keep the LED stick moving at a steady pace; jerky motions turn a clean streak into a mushy blur. Use a small aperture (f/8‑f/11), raise ISO just enough for a clean exposure, and set focus to manual so the lens never hunts.
Can I combine pixel stick light painting with other lighting tools, like sparkler fireworks or handheld LEDs, without causing color conflicts?
Absolutely you can mix them—just plan your palette and timing. Start with your pixel stick as the base, then add a sparkler or LED that’s a contrasting hue, or lock the pixel stick on a neutral tone and let the extra tool add a pop of color. Keep your camera on low ISO, 1‑2 sec exposure, and set white‑balance to daylight or a fixed Kelvin value. Test a shot, tweak the intensity, and you’ll avoid unwanted color clashes.