I still remember the first time I attempted to cook a steak – it was a disaster. I had read countless articles on how to get a perfect sear on a steak, but nothing seemed to work. The steaks were either burnt on the outside and raw on the inside, or just plain flavorless. It wasn’t until I understood the importance of preheating the skillet and using the right oil that I started to get it right. The common myth that you need to constantly flip the steak to achieve a perfect sear is just that – a myth. In fact, it’s often the opposite: letting the steak cook undisturbed for a few minutes can make all the difference.
As someone who’s spent years perfecting the art of cooking, I want to share my honest, no-hype advice with you. In this article, you’ll learn the simple yet crucial steps to achieve a perfect sear on your steak, every time. I’ll walk you through the process, from preparing the steak to plating it, and explain the science behind each step. Whether you’re a beginner or an experienced cook, you’ll find that my approach is easy to follow and yields consistent results. So, if you’re tired of mediocre steaks and want to learn how to get a perfect sear on a steak, keep reading – I’ve got you covered.
Table of Contents
Guide Overview: What You'll Need
Total Time: 30 minutes to 1 hour
Estimated Cost: $15 – $30
Difficulty Level: Intermediate
Tools Required
- Cast Iron Skillet or other oven-safe skillet
- Tongs or Spatula for flipping the steak
- Oven Mitts for handling hot skillet
- Meat Thermometer for checking internal temperature
Supplies & Materials
- Steak of choice preferably 1 to 1.5 inches thick
- Oil with high smoke point such as avocado oil or grapeseed oil
- Salt for seasoning
- Pepper for seasoning
- Optional seasonings such as garlic powder or paprika
Step-by-Step Instructions
- 1. First, let’s start with the foundation of a perfect sear: choosing the right cut of meat. I always recommend opting for a high-quality steak with a good balance of marbling, as this will help create a tender and flavorful final product. Look for cuts like ribeye or strip loin, and make sure they’re at least 1-1.5 inches thick to ensure a nice sear on the outside and a juicy interior.
- 2. Next, it’s time to bring your steak to room temperature. This is a crucial step that many people skip, but trust me, it makes all the difference. By letting your steak sit at room temperature for about 30-45 minutes before cooking, you’ll help it cook more evenly and prevent it from seizing up when it hits the hot pan.
- 3. Now, let’s talk about seasoning your steak. I like to keep things simple with a mixture of salt, pepper, and a pinch of sugar. Yes, you read that right – sugar! It helps balance out the savory flavors and creates a beautiful crust on the steak. Make sure to season your steak generously on both sides, but don’t overdo it – you want to be able to taste the meat, not just the seasonings.
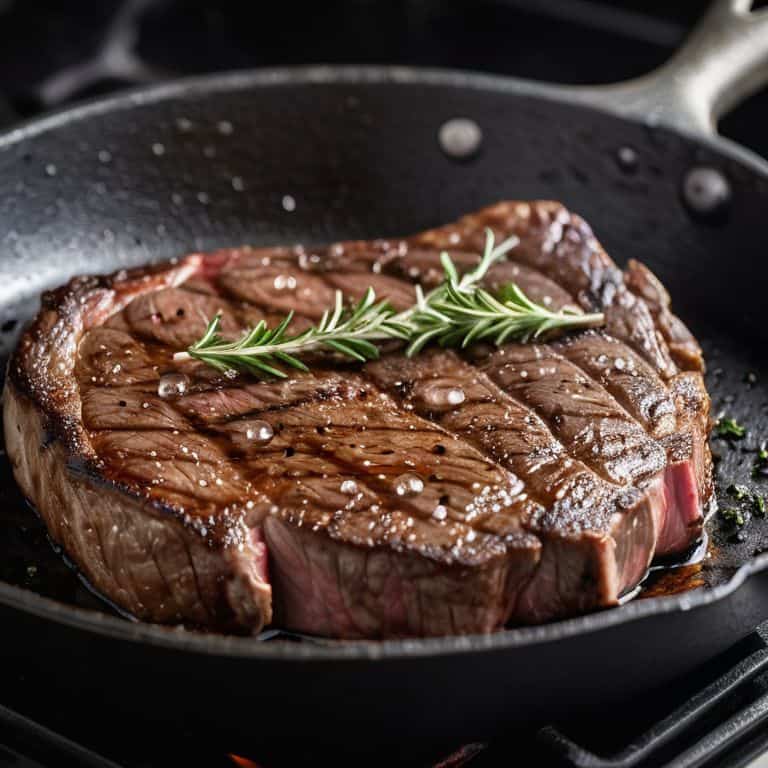
- 4. With your steak seasoned and at room temperature, it’s time to heat up your pan. I recommend using a cast-iron or stainless steel skillet, as they retain heat beautifully and can achieve a scorching hot temperature that’s perfect for searing. Add a small amount of oil to the pan – I like to use avocado or grapeseed oil – and let it heat up over high heat until it starts to shimmer and smoke slightly.
- 5. Once your pan is hot, it’s time to add your steak. Place it in the pan gently, away from you, to avoid any oil splatters. Let it cook for 3-4 minutes on the first side, or until you start to see a beautiful crust forming around the edges. You’ll know it’s ready to flip when it releases easily from the pan – if it’s still stuck, give it another minute or until it comes out effortlessly.
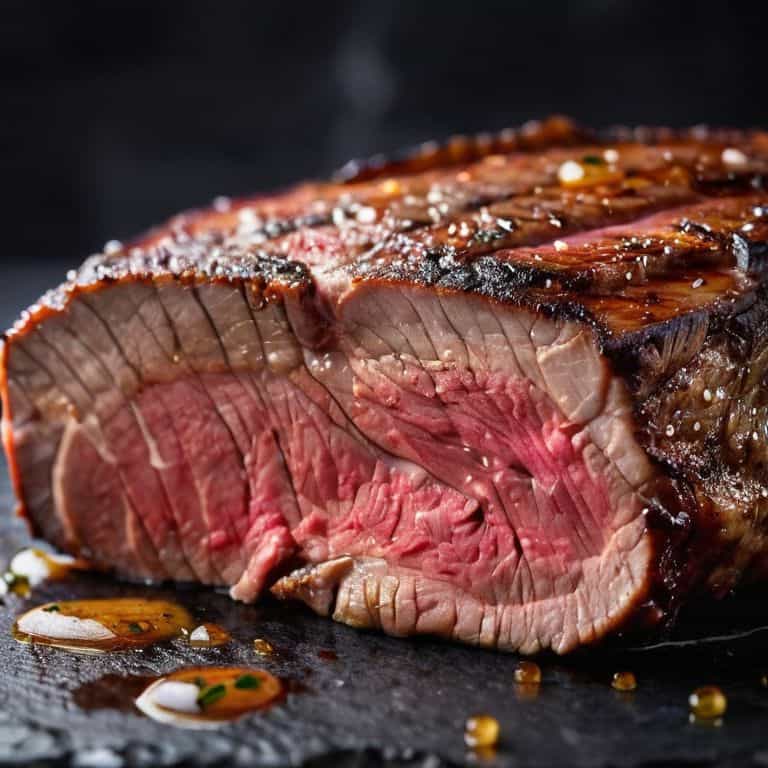
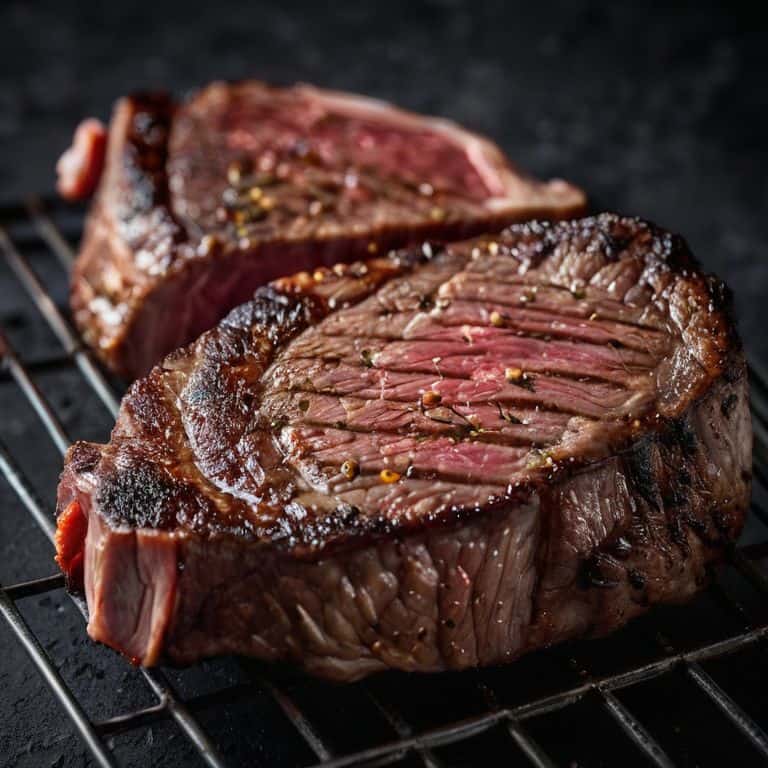
- 6. Flip your steak over and cook for an additional 3-4 minutes, or until it reaches your desired level of doneness. Use a meat thermometer to check the internal temperature – I like my steak medium-rare, which is around 130-135°F. Once it’s cooked to your liking, remove it from the pan and let it rest for a few minutes before slicing and serving.
- 7. Finally, let’s talk about slicing and serving your perfectly seared steak. I like to slice it against the grain, using a sharp knife to create thin, even slices. Serve it with your favorite sides – I’m a big fan of roasted vegetables and a side salad – and enjoy the fruits of your labor. Remember, practice makes perfect, so don’t be discouraged if your first few attempts at searing a steak don’t turn out exactly as you hoped. With time and patience, you’ll be a pro in no time!
Searing Steak Secrets
As we dive deeper into the world of steak searing, it’s essential to understand the steak searing techniques that set a perfect sear apart from a mediocre one. One often overlooked step is the importance of steak dry brining, which involves seasoning the steak and letting it sit for a period of time to allow the seasonings to penetrate the meat. This simple step can elevate the flavor and texture of your steak, making it a crucial part of the searing process.
When it comes to choosing the right oil for high-heat cooking, I always recommend using the best oil for high heat cooking, such as avocado oil or grapeseed oil. These oils have a high smoke point, which means they won’t burn or smoke when heated to high temperatures, resulting in a cleaner, more even sear. Additionally, using a cast iron skillet can be beneficial, as it retains heat well and can achieve a nice crust on the steak.
To achieve perfect doneness, it’s crucial to keep an eye on the steak cooking time, as overcooking can be a common mistake. Avoiding steak overcooking requires a combination of experience and attention to detail, but with practice, you’ll be able to cook your steak to perfection every time. By following these tips and techniques, you’ll be well on your way to becoming a steak-searing master, and your taste buds will thank you.
Mastering Steak Dry Brining Techniques
To take your steak searing game to the next level, let’s dive into the art of dry brining. This simple yet powerful technique involves sprinkling a pinch of salt on your steak and letting it sit for about an hour before cooking. The science behind it is fascinating – the salt helps to break down the proteins on the surface of the meat, creating a more even sear and a more tender final product.
By incorporating dry brining into your steak preparation routine, you’ll be amazed at the difference it makes. The key is to use just the right amount of salt and to let the steak sit for the perfect amount of time. I like to think of it as a little wake-up call for the steak, getting it ready to sear to perfection. With a bit of practice, you’ll be a pro at dry brining in no time, and your steaks will be all the better for it.
Unlocking High Heat With Best Oils
To achieve that perfect sear, we need to talk about the role of oil in our high-heat journey. I’m obsessed with experimenting with different oils to find the ones that bring out the best in our steak. Avocado oil, with its high smoke point, is one of my top picks – it adds a subtle buttery flavor that complements the char perfectly. Similarly, grapeseed oil, with its light, crisp taste, won’t overpower the natural flavors of the steak, allowing the dry brining magic to shine through. By choosing the right oil, we’re not just preventing our steak from sticking to the pan; we’re elevating the entire searing experience.
Searing to Perfection: 5 Essential Tips
- Choose the right cut of meat: Opt for high-quality steaks with a good balance of marbling, as this will help create a tender and flavorful crust
- Bring your steak to room temperature: Remove your steak from the fridge and let it sit at room temperature for about 30-45 minutes before cooking to ensure even cooking
- Select the perfect oil: Use a high-smoke-point oil like avocado or grapeseed oil to add flavor and prevent burning
- Don’t press down: Resist the temptation to press down on your steak with your spatula, as this can squeeze out juices and prevent a good crust from forming
- Let it rest: After searing your steak, let it rest for a few minutes to allow the juices to redistribute, resulting in a more tender and flavorful final product
Perfecting the Sear: 3 Key Takeaways
Always bring your steak to room temperature before searing to ensure an even cook and a crisper crust, just like the ones I’ve perfected in my own kitchen
Select the right oil for high-heat searing, such as avocado oil or grapeseed oil, which can handle the temperatures needed for a perfect sear without smoking or burning
Master the art of steak dry brining by seasoning your steak liberally with salt and letting it sit for at least 30 minutes to 1 hour before cooking, allowing the meat to retain its juices and develop a rich, savory flavor
The Sear Seeker's Wisdom
A perfect sear on a steak is not just about the heat, it’s about the harmony between the pan, the oil, and the steak itself – when all three come together in balance, that’s when the magic happens.
Julia Ashwood
Savoring the Perfect Sear

As we’ve explored the world of steak searing, it’s clear that achieving a perfect crust is not just about high heat or the right cut of meat. It’s about understanding the science behind the sear, from mastering steak dry brining techniques to unlocking the potential of high heat with the best oils. By following these steps and tips, you’ll be well on your way to creating restaurant-quality steaks that impress and delight. Remember, the key to success lies in the details, from the initial preparation to the final, satisfying sear.
So, the next time you fire up your skillet, I encourage you to view the process as an opportunity to unleash your inner chef. Don’t be afraid to experiment, to try new things, and to push the boundaries of what you thought was possible. With practice and patience, you’ll develop a sense of culinary confidence that will serve you well in all your kitchen endeavors. And when you finally achieve that perfect sear, you’ll know that it was all worth it – the wait, the effort, and the pursuit of culinary perfection.
Frequently Asked Questions
What type of steak is best suited for achieving a perfect sear?
For a perfect sear, I recommend a high-quality cut with good marbling, like a ribeye or strip loin. These cuts have the right balance of tenderness and flavor to hold up beautifully to a nice crust.
How do I prevent the steak from burning or overcooking while trying to get a perfect sear?
To prevent burning or overcooking, make sure your steak is at room temperature and pat it dry with paper towels before searing. Also, don’t overcrowd the skillet and don’t move the steak too much – let it develop a nice crust. I like to use a thermometer to check the internal temperature, it’s a game-changer!
Can I achieve a perfect sear on a steak without using a skillet, such as with a grill or oven?
While a skillet is ideal for a perfect sear, you can achieve great results with a grill or oven too. For grilling, make sure the grates are scorching hot and oil them to prevent sticking. In the oven, use a broiler or a screaming hot stone to get that nice crust. It’s all about high heat and precise timing, so don’t be afraid to experiment and find what works best for you.