I still remember the day I decided to tackle the blank walls of my quirky old house – I wanted to create a space that truly felt like home. As I delved into the world of a guide to gallery walls, I realized that it’s not just about hanging frames, but about telling a story. So many of us get caught up in the idea that creating a beautiful gallery wall is a daunting task, but I’m here to tell you that it’s actually a fun and creative adventure. With a little imagination and some practical tips, you can turn your walls into a stunning reflection of your personality and style.
In this article, I’ll share my honest and no-nonsense advice on how to create a gallery wall that’s uniquely yours. I’ll walk you through the process of choosing the right frames, selecting the perfect pieces to display, and arranging them in a way that tells your story. You’ll learn how to balance different shapes, sizes, and textures to create a visually appealing display, and how to avoid common mistakes that can make your gallery wall look cluttered or overwhelming. By the end of this guide, you’ll be equipped with the knowledge and confidence to create a beautiful gallery wall that reflects your personality and style, and becomes a cherished part of your a guide to gallery walls journey.
Table of Contents
Guide Overview: What You'll Need
Total Time: 2 hours 30 minutes
Estimated Cost: $50 – $100
Difficulty Level: Intermediate
Tools Required
- Level to ensure straight hanging
- Hammer for tapping nails into place
- Tape Measure to measure wall and frame distances
- Pencil to mark wall for frame placement
- Nail Gun optional, for quicker hanging
Supplies & Materials
- Picture Frames various sizes and styles
- Frame Hanging Kits including nails, screws, or adhesive strips
- Wall Anchors for heavy or large frames
- 6 inches of Fishing Line or Wire for leveling and aligning frames
- Command Strips for damage-free hanging
Step-by-Step Instructions
- 1. First, let’s start by gathering inspiration for our gallery wall – think about the story you want to tell with your photos, artwork, and other decorative pieces. Look through old albums, scroll through your phone, or browse through social media to find the perfect pieces that reflect your personality and style. I like to create a vision board or a digital folder with all my favorite images to get a sense of the overall aesthetic I’m aiming for.
- 2. Next, it’s time to choose a unifying theme for your gallery wall – this could be a specific color palette, a particular style of frame, or even a mix of frame shapes and sizes. Don’t be afraid to experiment and try out different combinations to see what works best for you. I personally love mixing and matching different frame styles to add some visual interest to my walls.
- 3. Now, let’s talk about selecting the perfect frames for our gallery wall – consider the style, size, and material of each frame, and think about how they’ll work together to tell your story. You can choose frames that are similar in style, or go for a more eclectic look with frames of different shapes, sizes, and materials. I’m a big fan of thrift stores and flea markets for finding unique and one-of-a-kind frames.
- 4. With our frames and artwork in hand, it’s time to plan the layout of our gallery wall – I like to use a combination of paper cutouts and digital tools to get a sense of the overall layout. You can also use a tool like a grid or a template to help you achieve a more balanced look. Remember, the key is to have fun and be creative – don’t be afraid to try out different layouts until you find one that feels just right.
- 5. Once we have our layout planned, it’s time to start hanging our frames – I like to begin with the center piece and work my way outwards, using a level and a pencil to mark the spot where each frame will go. Make sure to double-check your measurements and use a sturdy nail or screw to hang each frame. And don’t worry if it’s not perfect – a little bit of imperfection can add character to your gallery wall.
- 6. As we’re hanging our frames, let’s not forget to leave some breathing room between each piece – a good rule of thumb is to leave about 2-3 inches of space between each frame. This will help create a sense of visual flow and make your gallery wall feel more cohesive. You can also experiment with different spacing and arrangements to find a look that feels uniquely yours.
- 7. Finally, let’s take a step back and admire our handiwork – once our gallery wall is complete, take some time to appreciate the story it tells and the personality it reflects. Don’t be afraid to make adjustments or add new pieces over time – a gallery wall is a living, breathing thing that can evolve and change as you do. And most importantly, have fun and enjoy the process of creating a space that’s truly, uniquely yours.
A Guide to Gallery Walls
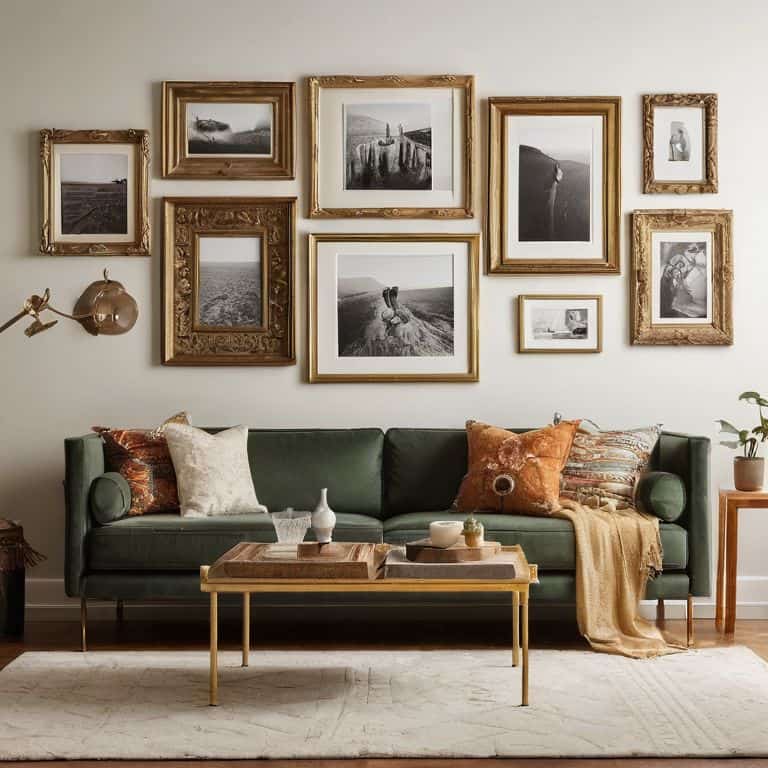
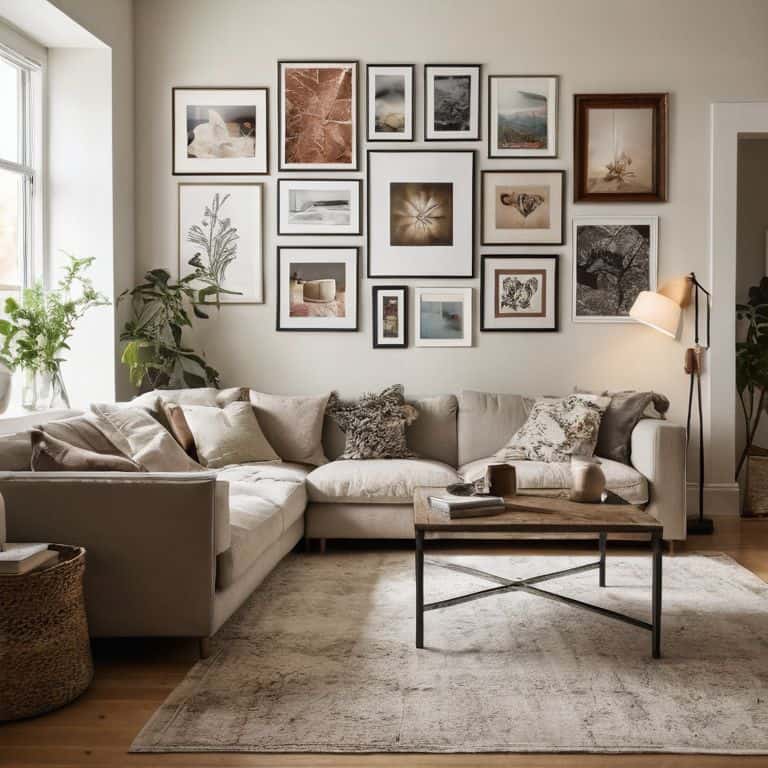
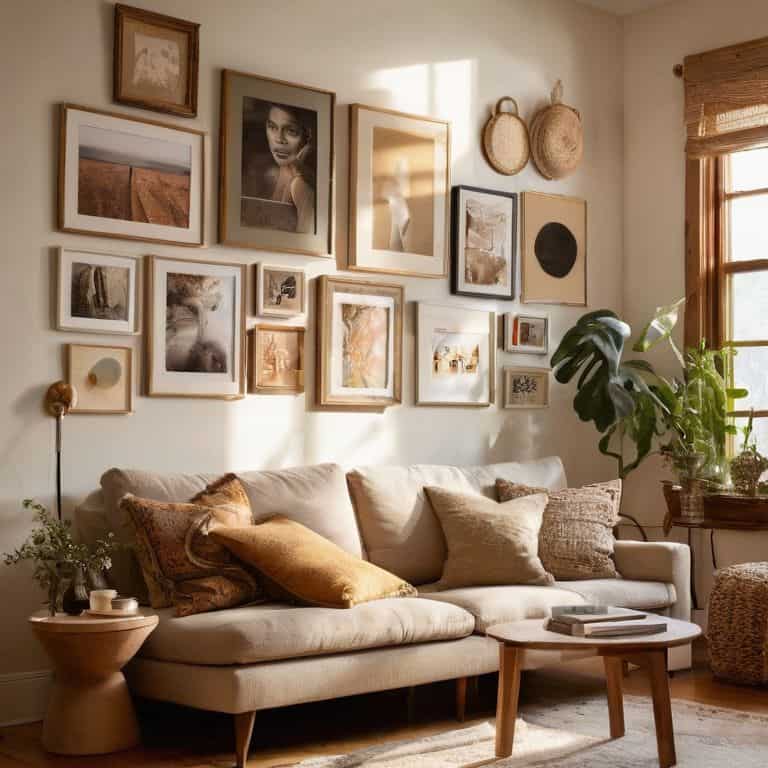
As I reflect on my own journey of creating a gallery wall, I realize that mixing frame styles and sizes can add a touch of personality to the space. It’s not just about filling the walls with frames, but about telling a story through the unique combination of shapes, textures, and colors. I’ve found that incorporating vintage frames, alongside modern ones, creates a visually interesting narrative.
When it comes to designing a photo gallery wall, I always consider the balance of color and texture. This means selecting frames that complement the colors and textures in the room, while also adding a pop of contrast to keep things engaging. For instance, if you’re working with a minimalist space, you can introduce bold colors and patterns through the frames or the artwork itself.
To take your gallery wall to the next level, try incorporating mirrors to add depth and create the illusion of a larger space. This technique can also help to reflect light and make the room feel brighter. Additionally, using command strips for hanging can be a game-changer, as they allow you to make adjustments without damaging the walls. By experimenting with these tips, you’ll be well on your way to crafting a one-of-a-kind gallery wall that truly reflects your personality and style.
Balancing Color and Texture
As I started hanging my own gallery wall, I realized that balancing color and texture is where the magic happens. It’s all about creating a visual rhythm that draws you in. I like to think of it as a recipe: mix a dash of bold frames with a pinch of soft, white mats, and top it off with a sprinkle of natural wood tones. The key is to experiment and have fun with it – don’t be afraid to try out different combinations until you find the one that feels just right.
For me, the perfect balance is all about contrasts. I love pairing sleek, modern frames with vintage, distressed pieces, or combining smooth, glossy photos with tactile, textured artwork. It’s all about telling a story, and the colors and textures you choose can totally transform the narrative. So go ahead, get creative, and see what kind of visual magic you can whip up!
Mixing Frames With Flair
Now that we’ve got the basics covered, let’s talk about the fun part – mixing frames with flair! I love combining different frame styles, shapes, and sizes to add some visual interest to my gallery wall. It’s like creating a unique piece of art that tells a story. I’ve found that pairing sleek, modern frames with vintage or ornate ones can create a fascinating contrast. And don’t be afraid to throw in some unconventional items, like mirrors or shadow boxes, to add some depth and texture. The key is to experiment and have fun with it – after all, it’s your story you’re telling!
Weaving Your Tale: 5 Essential Tips for a Captivating Gallery Wall
- Start with a story, not a theme: gather pieces that speak to you, from vintage family photos to eclectic artwork, and let them guide your gallery wall’s narrative
- Play with proportions: combine frames of varying sizes to create visual interest, balancing large statement pieces with smaller, more intimate ones
- Unify with a common thread: whether it’s a dominant color, frame style, or texture, find an element that ties your diverse pieces together, creating a sense of cohesion
- Experiment with negative space: don’t be afraid to leave some breathing room between frames, allowing each piece to shine and creating a sense of dynamic movement
- Step back and shuffle: as you build your gallery wall, periodically take a step back to assess the layout, and don’t hesitate to swap pieces or adjust the arrangement until it feels just right
Bringing Your Story to Life: 3 Key Takeaways
Embrace the chaos and have fun with the process – remember, your gallery wall is a reflection of your unique story and the people, places, and things that bring you joy
Experiment with different frame styles, colors, and textures to add depth and visual interest to your wall, and don’t be afraid to mix and match to create a look that’s all your own
Step back, evaluate, and adjust as you go – the beauty of a gallery wall lies in its imperfections, so don’t stress about making it perfect, and enjoy the journey of creating a space that tells your story
The Heart of the Gallery
A gallery wall is more than just a collection of frames – it’s a visual tapestry that weaves together the threads of our memories, passions, and personalities, telling the story of who we are and where we’ve been.
Maya Rivera
The Final Brushstroke
As we conclude our journey to creating the perfect gallery wall, let’s take a moment to reflect on the key elements that bring this visual story to life. We’ve discussed the importance of mixing frames with flair, balancing color and texture, and carefully curating the pieces that make your heart skip a beat. By embracing these principles, you’ve transformed your blank walls into a vibrant tapestry that tells a unique and personal story. Remember, the beauty of a gallery wall lies in its imperfections and the emotional connection you feel with each piece.
Now, as you step back to admire your handiwork, I hope you feel an overwhelming sense of creative pride. Your gallery wall is more than just a collection of frames – it’s a reflection of your personality, interests, and values. Don’t be afraid to make adjustments or add new pieces as your story evolves. With every change, your gallery wall will continue to grow and flourish, becoming an ever-unfolding narrative that inspires and delights you and your loved ones.
Frequently Asked Questions
How do I choose the right frame styles to match my room's decor?
Choosing the right frame styles is like curating characters for your room’s story – they should complement the plot, not overwhelm it. I like to mix frame styles, but stick to a unifying thread, like metallic tones or vintage vibes, to tie everything together. My power tool, Bertha, and I have had some amazing flea market finds that add just the right touch of personality!
What's the best way to ensure my gallery wall is level and evenly spaced?
My secret to a level and evenly spaced gallery wall? It’s all about the prep work, friends! I use a trusty laser level and a piece of graph paper to map out my design before I start hammering. My power tool, Bertha, and I also make sure to double-check our measurements to ensure everything is just right.
Can I mix different frame sizes and shapes to create a unique and visually interesting gallery wall?
Absolutely, I love mixing frame sizes and shapes for a unique look. It adds character to your gallery wall and tells a more interesting story. Think of it as a curated collection of your favorite memories, each with its own special frame to match its personality.