I still remember the day I realized that best workbench lighting ideas weren’t just about slapping some lamps on my workbench. I was in the middle of a critical project, and the poor lighting was causing me to make mistake after mistake. It was frustrating, to say the least. But then it hit me – good lighting is not just about seeing what you’re doing, it’s about creating an environment that fosters creativity and precision. I began to experiment with different lighting setups, and the results were astonishing. My projects started to turn out better, and I was having more fun making them.
In this article, I’ll share my no-nonsense approach to workbench lighting, cutting through the clutter of overly complicated setups and expensive solutions. You’ll learn how to create a well-lit workspace that inspires your creativity and improves your craft, without breaking the bank. I’ll walk you through my favorite best workbench lighting ideas, from simple DIY solutions to more advanced setups, and provide you with practical tips on how to implement them in your own workshop. Whether you’re a seasoned maker or just starting out, this guide will help you create a workspace that’s functional, efficient, and enjoyable to work in.
Table of Contents
Guide Overview: What You'll Need
Total Time: 2 hours 30 minutes
Estimated Cost: $50 – $100
Difficulty Level: Intermediate
Tools Required
- Drill Press (for precise drilling)
- Circular Saw (for cutting lumber)
- Hand Saw (for fine-tuning cuts)
- Wire Strippers (for stripping electrical wires)
- Pliers (for gripping small objects)
- Screwdriver Set (with flathead and Phillips head options)
Supplies & Materials
- 2-in x 4-in lumber (for shelving and support)
- LED Light Strips (for under-shelf lighting)
- Fluorescent Light Fixtures (for overhead lighting)
- Power Strip (with surge protection)
- Electrical Wire (14-gauge or 12-gauge)
- Light Switch (with a 6-feet cord)
Step-by-Step Instructions
- 1. First, let’s assess the workshop space and figure out what kind of lighting we need – are we working with a small, cozy area or a large, industrial-style garage? This will help us determine the type and number of lights required to achieve optimal illumination.
- 2. Next, we need to consider the color temperature of our lighting – do we want a cool, blue-ish tone or a warm, yellow-ish glow? This can greatly affect the ambiance of our workshop and even influence our mood and productivity, so it’s essential to choose a temperature that suits our style.
- 3. Now, let’s talk about the different types of lighting we can use – we’ve got overhead lighting, which provides general illumination, and task lighting, which focuses on specific areas of the workbench. We can also use a combination of both to create a well-lit and versatile workspace.
- 4. To install our lighting, we’ll need to plan the layout carefully – take into account the location of our workbench, tools, and any other obstructions that might affect the lighting. We can use a simple sketch or a 3D modeling tool to visualize our design and make any necessary adjustments.
- 5. Once we have our layout, it’s time to choose the right fixtures – we can opt for traditional fluorescent lights, or go for something more modern like LED strips or pendant lights. Consider the energy efficiency and durability of each option, as well as their overall aesthetic appeal.
- 6. With our fixtures in hand, we can start installing the lighting – this may involve drilling holes, running wires, or mounting brackets, so be sure to follow all safety precautions and consult the manufacturer’s instructions if needed. Take your time and work methodically to ensure a secure and professional-looking installation.
- 7. Finally, let’s not forget to add some personality to our lighting setup – we can use colored gels, diffusers, or other creative elements to give our workshop a unique and welcoming atmosphere. Experiment with different effects and see what works best for you and your space.
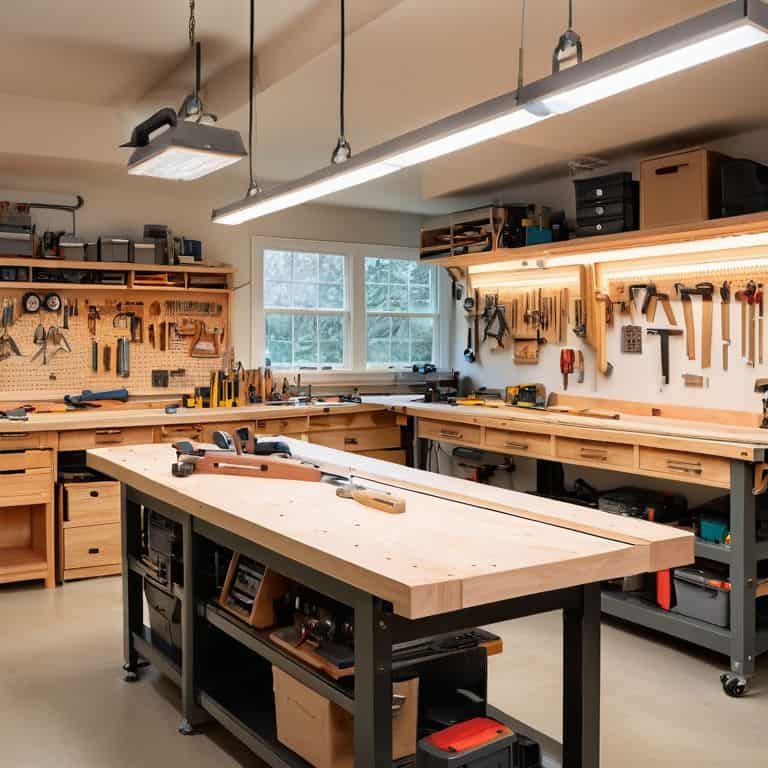
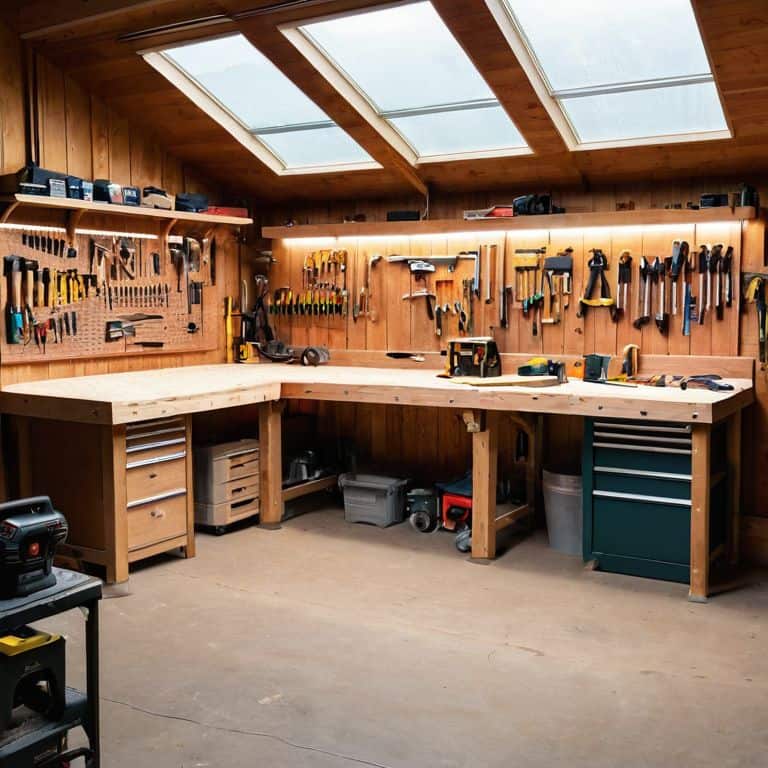
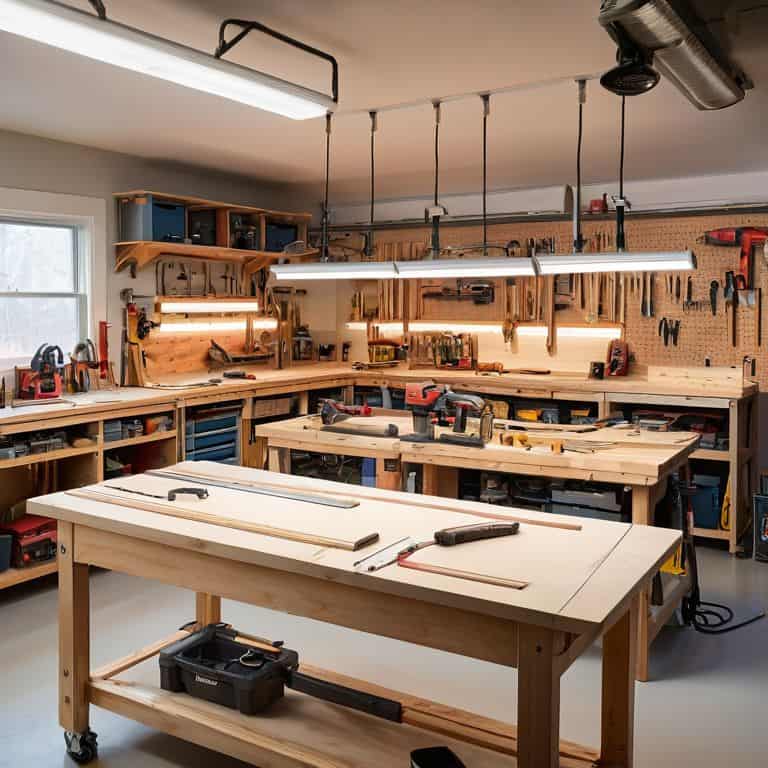
Best Workbench Lighting Ideas
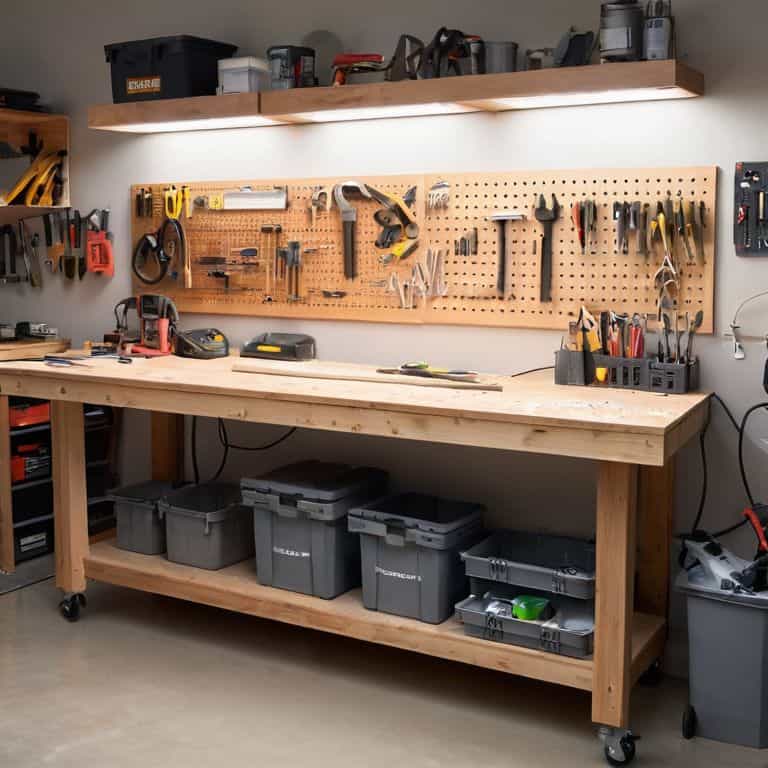
When it comes to setting up your workshop, proper lighting is crucial for both safety and productivity. I’ve found that energy efficient workshop lighting is the way to go, not only for the environment but also for my wallet. One of my favorite solutions is using LED strip lighting for workbenches, which provides a flexible and customizable lighting system.
In my own workshop, I’ve installed task lighting for garage workstations to ensure that each area has the right amount of light for the task at hand. This includes adjustable arm lighting for workbenches, which allows me to direct the light exactly where I need it. Whether I’m working on a delicate restoration project or building a custom planter, having the right lighting makes all the difference.
For larger workshops, high bay lighting can be a great option, providing a broad coverage of light. However, I’ve also found that under cabinet lighting for workshops can be a game-changer, especially when working on smaller projects or in tight spaces. By combining these different lighting solutions, you can create a well-lit and functional workshop that inspires creativity and productivity.
Energy Efficient Task Lighting
Now that we’ve covered the awesome world of LED strip lighting, let’s talk about another game-changer: energy efficient task lighting. This is where things get really cool – we’re talking about lighting that’s specifically designed to shine a light on your work, without burning a hole in your wallet or the environment. I’m a huge fan of using LED spotlights or under-cabinet lights to illuminate my work area, and they’re super easy to install.
These energy-efficient task lights are perfect for highlighting specific areas of your workbench, like your vice or tool sharpening station. Plus, they’re usually really affordable and use a fraction of the energy of traditional lighting options. I’ve got a few of these bad boys set up in my own workshop, and they’ve been a total revelation – no more straining to see what I’m working on!
Led Strip Lighting for Workbenches
LED Strip Lighting for Workbenches is a total game-changer – it’s like having a flexible, adaptable lighting system that can conform to any workbench shape or size. I’ve used these strips to illuminate my own workbench, and let me tell you, it’s a revelation. The LED strips are super easy to install, and they provide a crazy amount of light without generating any heat. Plus, they’re energy-efficient, so you can leave them on for hours without worrying about your electricity bill. I like to place them under my workbench, so the light shines up and illuminates my projects from beneath – it’s a really cool effect.
Lighting Up Your Workspace: 5 Essential Tips
- Illuminate Your Work Area: Use a combination of overhead lighting and task lighting to ensure you’ve got every angle covered
- Color Temperature Matters: Warm white light (2700K-3000K) is easier on the eyes for extended work periods, while cool white light (3500K-5000K) is better for detail-oriented tasks
- Shine a Light on Flexibility: Opt for lighting with adjustable arms or magnetic bases to direct light exactly where you need it
- Cut the Glare: Position lights to minimize reflections on shiny surfaces, and consider using diffusers or softboxes for a more even glow
- Layer Your Lighting: Don’t rely on a single light source – layering different types of lighting will help you achieve the perfect balance of brightness and ambiance in your workshop
Key Takeaways to Illuminate Your Workspace
Proper workbench lighting is not just about seeing what you’re doing, it’s about setting the tone for a productive and enjoyable building experience
LED strip lighting and energy-efficient task lighting are game-changers for any workshop, providing focused light where you need it most without breaking the bank
Remember, the right lighting can turn your workshop from a dimly lit cave into a creative haven, so don’t be afraid to experiment and find the perfect balance of light and shadow to bring your projects to life
Illuminating the Path to Creativity
The right workbench lighting is like the spark that sets off a creative explosion – it’s not just about seeing what you’re doing, it’s about bringing your ideas to life in vivid detail!
Franklyn "Frank" Bishop
Wrapping Up: Lighting Your Way to Workshop Bliss
As we’ve explored the best workbench lighting ideas, it’s clear that proper lighting is not just about seeing what you’re doing – it’s about creating an environment that fosters creativity and productivity. From LED strip lighting to energy-efficient task lighting, each option has its unique benefits. By choosing the right lighting for your workbench, you’re not just illuminating your workspace; you’re setting yourself up for success in every project you tackle. Whether you’re a seasoned maker or just starting out, the right lighting can make all the difference in the world.
So, as you head back to your workshop, remember that lighting is just the beginning. It’s about embracing the process, learning from your mistakes, and having fun along the way. With the right mindset and the right lighting, you’ll be unstoppable. Turn up your favorite soundtrack, fire up those power tools, and get ready to create something truly amazing. The world of DIY is full of endless possibilities, and with great lighting on your side, you’re ready to take on whatever project comes next.
Frequently Asked Questions
What are the most common mistakes to avoid when installing LED strip lighting under my workbench?
Whoa, don’t solder those strips just yet! Common mistakes to avoid include not measuring your workbench’s underside, forgetting to leave some slack for cord management, and not testing the LED strip’s adhesive – trust me, you don’t want it falling off mid-project!
How can I determine the optimal color temperature for my workbench lighting to reduce eye strain?
Dude, color temperature is key! For workbench lighting, I swear by a warm white (around 3000K-3500K) for tasks that need precision, and a cool white (5000K-6500K) for tasks that require a lot of attention to detail – it’s all about finding that sweet spot to reduce eye strain and keep you building like a rockstar!
Can I use smart light bulbs with my workbench lighting to make it voice-controlled or scheduled?
Absolutely, you can use smart bulbs to take your workbench lighting to the next level. I’ve experimented with them in my own workshop, and it’s a total game-changer – voice control, scheduling, and even color temperature adjustment. Just make sure to choose bulbs that are compatible with your smart home system and can handle the workshop’s rugged environment.