I still remember the first time I had to fix a running toilet in my own home – it was a real baptism by fire. I was a young DIY enthusiast, and my dad, a seasoned handyman, had just handed over the reins to me. The sound of that incessantly running water was like music to my ears, a challenge waiting to be tackled. And tackle it I did, with a mix of trial and error, and a lot of patience. If you’re reading this, chances are you’re in the same boat, searching for a reliable guide on how to fix a running toilet. Well, you’re in luck because I’m about to share my hard-earned knowledge with you.
In this article, I promise to cut through the noise and give you the lowdown on fixing that pesky toilet. You won’t find any intimidating jargon or complicated diagrams here. Instead, I’ll walk you through a straightforward, step-by-step process that’s easy to follow, even if you’re a complete beginner. We’ll cover the common causes of a running toilet, the tools you’ll need, and the nitty-gritty of the repair process. By the end of this guide, you’ll be equipped with the knowledge and confidence to fix a running toilet like a pro, and save yourself a pretty penny in the process. So, let’s get started and turn that running toilet into a thing of the past!
Table of Contents
Guide Overview: What You'll Need
Total Time: 30 minutes to 1 hour
Estimated Cost: $10 – $30
Difficulty Level: Easy
Tools Required
- Adjustable Wrench for adjusting the toilet handle
- Channel-Type Pliers for gripping small parts
- Needle-Nose Pliers for reaching into tight spaces
- Screwdriver flathead and Phillips
Supplies & Materials
- Toilet Flapper replacement part
- Toilet Fill Valve replacement part
- Water Supply Line replacement part, various lengths
- Teflon Tape for threaded pipe connections
- Plumber’s Putty for creating a watertight seal
Step-by-Step Instructions
- 1. First, let’s get familiar with the anatomy of our toilet. We need to understand what’s going on inside that tank to fix the issue. Take a look at the fill valve, the flapper, and the overflow tube. These are the key players in our little drama, and one of them might be the culprit behind our running toilet woes.
- 2. Next, we need to turn off the water supply to the toilet. This is usually done by locating the shut-off valve behind the toilet and turning it clockwise. Don’t worry if you’re not sure what you’re doing; it’s all part of the process, and we’re learning as we go. Once you’ve turned off the water supply, flush the toilet to drain the tank.
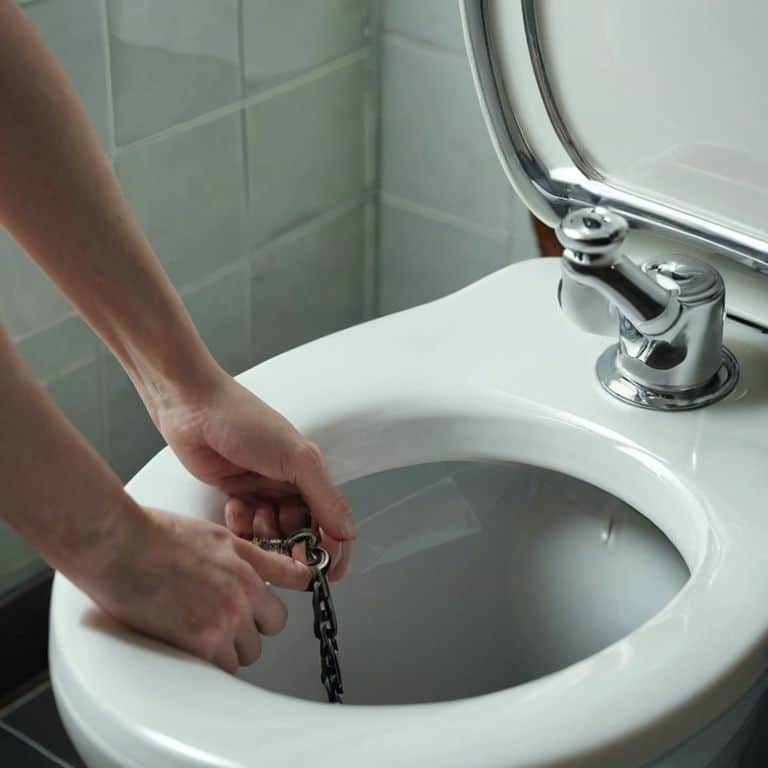
- 3. Now, it’s time to dive into the tank. Put on your gloves, and let’s take a closer look at the flapper and the fill valve. Check if the flapper is sealing properly or if it’s damaged. If it’s not sealing, water will continue to flow into the bowl, making our toilet run non-stop. We might need to replace it, but let’s not jump to conclusions just yet.
- 4. Let’s investigate the fill valve and the float arm. The float arm is usually connected to the fill valve, and its job is to shut off the water supply when the tank is full. If the float arm is not adjusted correctly or if it’s damaged, the valve won’t shut off, and our toilet will keep running. We can try adjusting the float arm to see if that solves the problem.
- 5. If adjusting the float arm doesn’t work, we might need to replace the fill valve or the flapper. Don’t worry; it’s not as scary as it sounds. We can purchase a replacement at our local hardware store, and it’s usually a pretty straightforward process. Just remember to turn off the water supply before we start tinkering with anything inside the tank.
- 6. Once we’ve replaced any faulty parts, it’s time to test our handywork. Turn the water supply back on, and flush the toilet a few times to make sure everything is working as it should. If the toilet is still running, we might need to go back to the drawing board and check for any other issues, like a clogged overflow tube or an improperly sealed flapper.
- 7. Finally, let’s clean up our mess and take a step back to admire our work. We’ve not only fixed our running toilet, but we’ve also learned a thing or two about how it works. That’s what DIY is all about – getting our hands dirty and gaining a new appreciation for the things we often take for granted. Now, go forth and spread the word: fixing a running toilet is easier than you think, and it’s a great way to save some water and money in the process.
Fixing a Running Toilet
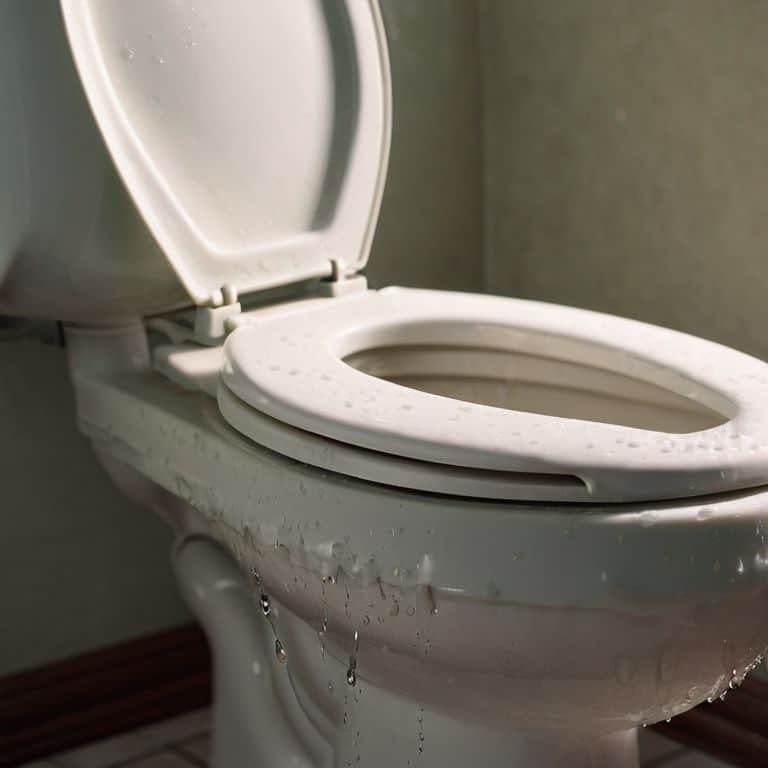
As we dive into the world of toilet troubleshooting, it’s essential to understand the common causes of a running toilet. One of the most frequent culprits is a faulty toilet flapper replacement, which can be easily swapped out with a new one. When diagnosing the issue, it’s crucial to listen carefully for any unusual sounds, as they can indicate problems with the fill valve or other internal components.
To further refine our troubleshooting process, let’s explore the art of diagnosing fill valve issues. This often involves adjusting the toilet fill valve to ensure it’s not overfilling the tank, which can lead to a constantly running toilet. By making a few simple adjustments, you can save a significant amount of water and reduce your utility bills. It’s all about finding that sweet spot where the water level is just right.
In the spirit of troubleshooting a constantly running toilet, remember that patience and persistence are key. Don’t be afraid to get your hands dirty and try out a few different solutions until you find the one that works for you. With a little practice and experience, you’ll become a pro at identifying and fixing common toilet problems and solutions in no time.
Toilet Flapper Replacement Tips
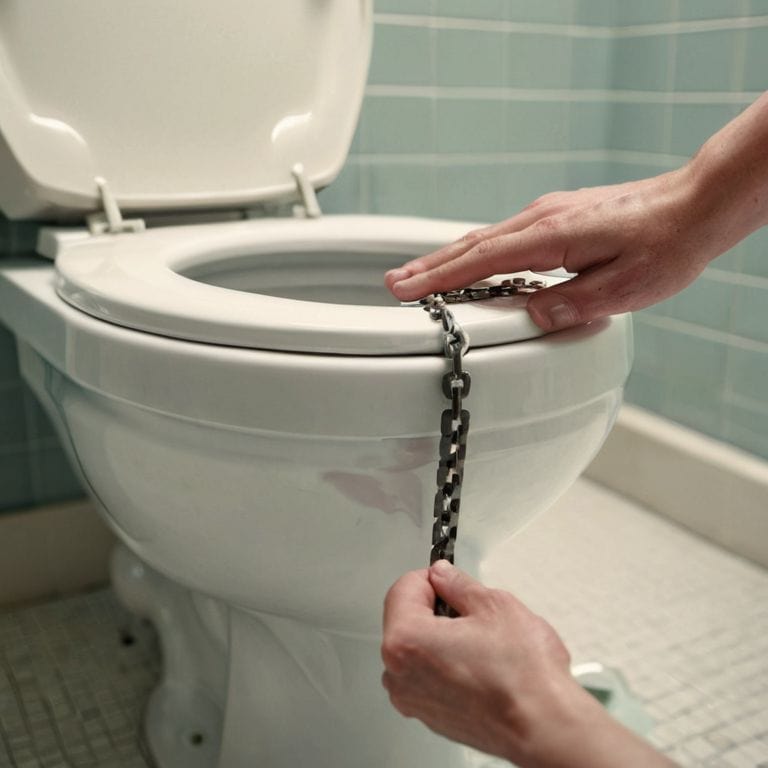
Now that we’ve tackled those pesky fill valve issues, let’s move on to another common culprit behind a running toilet: the flapper. This little guy’s responsible for sealing the tank, and if it’s not doing its job, water’s gonna keep flowing. When replacing the flapper, make sure to get one that’s compatible with your toilet model – don’t worry, it’s an easy swap.
I like to think of it as a little “heart transplant” for your toilet. Just remember to turn off the water supply before you start, and take a peek at the chain length to ensure it’s not too loose or too tight. With the new flapper in place, your toilet should be humming along in no time. And hey, if you’re feeling extra handy, why not give that old flapper a proper sendoff – maybe even repurpose it as a quirky little plant marker in your urban garden?
Troubleshooting Fill Valve Issues
Now that we’ve got the basics covered, let’s dive into some common issues that might be driving you crazy – like a fill valve that’s not playing nice. If your toilet’s fill valve is faulty, you might notice water constantly running or the tank not filling up properly. To troubleshoot, first check if the valve is clogged with mineral deposits or debris.
Give it a good cleaning and make sure all the parts are moving freely. If that doesn’t do the trick, you might need to replace the entire fill valve – don’t worry, it’s a pretty straightforward process, and I’ve got a video on my channel that walks you through it step-by-step.
Don't Let it Flush Your Sanity: 5 Essential Tips to Fix a Running Toilet
- Tighten the Loose Ends: Check if the toilet handle is loose and tighten it if necessary, as a loose handle can prevent the flapper from closing properly
- Flush Out the Debris: Make sure to clean out any debris or mineral buildup from the toilet tank and bowl to ensure proper water flow and valve function
- Get a Grip on the Flapper: Inspect the flapper for signs of wear or damage and replace it if necessary, as a faulty flapper can cause continuous running
- Fill ‘Er Up: Adjust the fill valve to the correct water level, ensuring it’s not overflowing and wasting water, and also preventing the flapper from closing too quickly
- Silence the Screaming Valve: If your fill valve is screaming or hissing, it might be due to high water pressure or a faulty valve; consider installing a pressure-reducing valve or replacing the fill valve altogether
Key Takeaways for a Flush-Free Life
Always remember to turn off the water supply before attempting any DIY repairs on your toilet, trust me, you don’t want a flood on your hands!
Troubleshooting fill valve issues and replacing that pesky toilet flapper can be a breeze with the right tools and a bit of patience – don’t be afraid to get your hands dirty and give it a try!
With a few simple tweaks and some TLC, you can say goodbye to that annoying running toilet and hello to a lower water bill and a clearer conscience – happy DIY-ing, folks!
The Fix-It Philosophy
A running toilet isn’t just a problem to solve, it’s an opportunity to get your hands dirty and learn something new – and that’s where the real magic happens, my friends!
Franklyn "Frank" Bishop
You Did It: Toilet Troubleshooting Mastery
We’ve covered a lot of ground in this DIY journey, from understanding the basics of a running toilet to troubleshooting fill valve issues and replacing that pesky toilet flapper. The key takeaway is that fixing a running toilet is well within your reach, and with these steps, you’ve not only saved yourself some cash but also gained a deeper understanding of how your toilet works. Remember, every mistake is an opportunity to learn, and I’m proud of you for taking the first step towards becoming a DIY master. Don’t be too hard on yourself if things didn’t go exactly as planned – it’s all part of the process.
As you stand back to admire your handiwork, remember that the joy of making and fixing things isn’t just about the end result; it’s about the journey, the process of creation, and the sense of accomplishment that comes with it. So, go ahead and celebrate this small victory, because it’s a stepping stone to even more exciting projects. Keep tinkering, stay curious, and always keep in mind that your next DIY adventure is just around the corner, waiting for you to turn it into something truly amazing.
Frequently Asked Questions
What are the most common causes of a running toilet and how can I identify them?
Alright, let’s dive in! Common culprits behind a running toilet are a faulty flapper, misaligned or clogged fill valve, or a broken overflow tube. To identify the issue, start by lifting the tank lid and observing the water flow – is it continuously running? Check for water level, listen for unusual sounds, and look for signs of mineral buildup or corrosion.
Can I fix a running toilet without replacing any parts, or is it always necessary to buy new components?
Hey, buddy, you can often fix a running toilet without breaking out the wallet for new parts. Sometimes, it’s just a matter of adjusting the flapper chain or cleaning out mineral buildup. Let’s troubleshoot and see if we can’t get your toilet running smoothly without replacing anything.
How do I know if I need to adjust or replace the toilet flapper, and what are the signs of a faulty flapper?
Dude, if your toilet’s still running like crazy after tweaking the fill valve, it’s probably flapper time! Check for signs like a flapper that won’t seat properly, or water constantly leaking into the bowl. If you spot any of these, it’s likely time to adjust or swap out that flapper for a new one.